Table of Content
Introduction
LED strip lights are the go-to choice for professionals because of their versatility, efficiency, and variety of customization options. Replacing the entire strip when one section gets damaged can be expensive. Luckily there are practical ways to repair your LED strips thanks to solder-free connectors and soldering methods. Solder-free LED connectors offer a simple and successful way to repair broken LED strips without the need for specialized tools or expertise. If professionals and DIYers alike know how to apply these connectors alongside basic soldering, then the longevity of an LED installation can be achieved and thereby reducing waste and costs.
Understanding LED Strip Construction and Common Failure Points
LED strips consist of a flexible circuit board embedded with LEDs, resistors, and copper traces. These components are arranged in series or parallel circuits, making specific sections susceptible to damage.
Common failure points include:
- Broken Connections: Repeated bending, pulling, or installation errors can sever circuit traces.
- Physical Damage: Cuts, twists, or impact can cause a section of the strip to stop working.
- Moisture Exposure: Non-waterproof strips exposed to moisture can corrode, causing failure.
- Overheating: Poor ventilation or excessive power draw can degrade components.
Choosing the Right Repair Method: Solder-Free Connectors vs. Soldering
Solder-Free Connectors (Recommended for Most Repairs)
✅ Best for quick, tool-free repairs
✅ No soldering experience required
✅ Easy to replace or reconfigure
✅ Ideal for home, retail, and commercial applications
Soldering (For Permanent or Custom Repairs)
✅ Stronger and longer-lasting connection
✅ Best for high-vibration areas (e.g., vehicles, moving parts)
✅ Ideal for professionals comfortable with soldering tools
For most indoor or low-stress applications, solder-free connectors are the go-to choice. However, if you need a more permanent solution, soldering may be preferable.
Tools and Materials for LED Strip Repair
For Solder-Free Connector Repairs:
- LED Solder-Free Connectors (e.g., gapless, L-shaped, T-shaped, or extension connectors)
- Wire cutters/strippers
- Multimeter (to test connections)
For Soldering Repairs:
- Soldering iron (temperature-controlled recommended)
- Solder wire (rosin-core recommended)
- Soldering flux
- Helping hands (optional but useful)
- Heat shrink tubing
- Electrical tape
- Isopropyl alcohol (for cleaning solder pads)
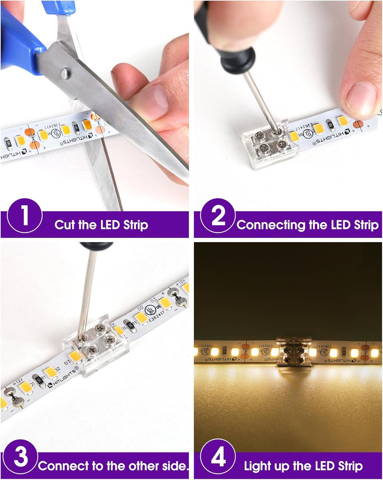
Step-by-Step Guide: Repairing LED Strips with Solder-Free Connectors
1. Identify the Faulty Section
- Use a multimeter to confirm the break in the LED strip.
2. Cut the Strip at the Damaged Section
-Use sharp scissors or a utility knife to cut cleanly at the designated copper cut points.
3. Prepare the LED Strip Ends
- Remove any silicone coating (if applicable).
- Ensure the copper pads are exposed and clean.
4. Insert the Strips into the Connector
- Open the solder-free connector latch.
- Align the LED strip’s copper pads with the connector’s terminals.
- Insert the strip fully and close the latch firmly.
5. Test the Connection
- Plug in the power supply and test the LED strip.
- If it doesn’t work, recheck alignment and contact points.
6. Secure the Connection
- Use heat shrink tubing or electrical tape to reinforce the joint.
💡 Tip: Different types of solder-free connectors (e.g., corner connectors, extension wires) make it easy to customize the repair for various installations.
Step-by-Step Guide: Soldering a Dead Section (For Permanent Fixes)
1. Identify the Faulty Section
- Use a multimeter to confirm the break in the circuit.
2. Cut and Prepare the LED Strip Ends
- Cut the damaged section at the nearest copper pads.
- Use a knife to remove any silicone coating around the pads.
3. Tin the Copper Pads
- Apply a small amount of flux to improve adhesion.
- Heat the pad with a soldering iron and apply a small amount of solder.
4. Prepare Jumper Wires
- Cut small wires to bridge the broken gap.
- Strip the ends and tin them with solder.
5. Solder the Connection
- Solder each wire to the respective copper pad, ensuring solid joints.
6. Test and Insulate
- Use a multimeter to check continuity.
- Apply heat shrink tubing over the soldered area for protection
Troubleshooting Common Connector and Soldering Issues
- LED strip not lighting up? Check power alignment and ensure proper contact in the connector.
- Flickering LED strip? This may indicate a loose connector latch or weak solder joint.
- Overheating? Ensure proper power supply and heat dissipation.
Long-Term Maintenance and Prevention of LED Strip Failure
- Use a compatible power supply to avoid overloading.
- Ensure proper heat dissipation using aluminum channels.
- Avoid excessive bending to prevent internal wire breakag
Conclusion
With both solder-free connectors and soldering techniques, professionals can repair LED strips efficiently, reducing downtime, costs, and waste. Choosing the right method ensures reliability, whether for quick fixes or permanent installations.
By mastering these techniques, professionals can stay ahead in the LED lighting industry while offering superior service.
About HitLights:
HitLights is a leading provider of high-quality LED lighting and low voltage LED drivers, and mounting supplies catering to diverse needs in residential, commercial, and event settings. With a commitment to innovation, eco-friendly lighting, and customer satisfaction, HitLights continues to illuminate spaces with innovations be it micro or macro technology.
By the way, if you are a professional installer, an integrator, or a business owner and you want to: Save MORE! And Do MORE Projects!
Get Factory Direct Pricing when you join our Professional Partner Program RISK-FREE, NO CONTRACTS, NO HASSLE PROCESS there is nothing to lose but MORE to GAIN!
If you have any additional questions, feel free to reach out to us at customerservice@hitlights.com or give us a call at 1 (855) 768-4135. Our team of expert engineers and electricians are here to assist you every step of the way!
*Disclaimer: The information provided in this article is for general informational purposes only.
