Table of Content
Introduction
LED strip lights are a go-to choice for home decor, commercial spaces, and DIY projects because they’re versatile, energy-efficient, and available in a range of vibrant colors. But when an LED strip controller or remote dimmer stops working, it can throw off your entire lighting setup. That’s why troubleshooting the issue is key to getting things back on track without unnecessary replacements.
Common Symptoms of LED Strip Controller Failures
Before diving into troubleshooting, it’s important to recognize the symptoms that indicate a problem with the LED strip controller. Common issues include:
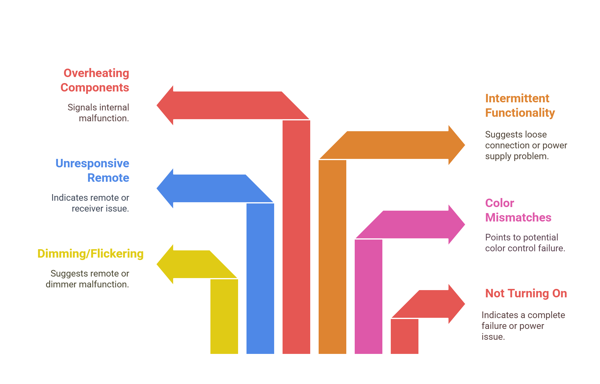
- LED Strip Not Turning On: The most obvious sign of failure is when the LED strip does not respond at all.
- Dimming or Flickering Issues: The lights may flicker or not dim properly when using the remote dimmer.
- Color Mismatches: The LED strip displays incorrect colors, possibly due to a faulty controller.
- Unresponsive Remote: The remote control does not adjust brightness, change colors, or turn the lights on/off.
- Intermittent Functionality: The LED strip may work sporadically, indicating a loose connection or power supply issue.
- Overheating Components: A controller that becomes unusually hot may signal an internal malfunction.
Step-by-Step Troubleshooting Guide
1. Check the Power Supply
A malfunctioning power supply is one of the most common reasons an LED strip controller fails. To verify if the issue is power-related:
- Ensure that the power adapter is securely plugged into a working outlet.
- Check the power rating of your LED strip lights and compare it with the output of the power adapter.
- Use a multimeter to measure the voltage output from the power adapter to confirm it matches the LED strip’s voltage requirement (e.g., 12V or 24V).
- If the adapter is faulty, replace it with a compatible unit.
2. Inspect the LED Strip Connection
A poor connection between the LED strip and the controller can cause erratic behavior. To ensure proper connectivity:
- Verify that the LED strip is securely plugged into the controller, with all pins correctly aligned.
- Check for any visible damage to the connector, such as bent pins or broken solder joints.
- If applicable, clean the connector contacts with a soft brush or compressed air.
3. Test the LED Strip Independently
- If the LED strip is not responding, testing it separately can determine whether the issue lies with the strip or the controller.
- Connect the LED strip directly to a compatible power source (bypassing the controller).
- If the strip lights up and functions properly, the controller may be faulty.
- If the LED strip still does not work, the issue may lie within the strip itself or the power supply.
4. Verify the Remote and Receiver
Many LED strip controllers use an infrared (IR) or radio frequency (RF) remote. If the remote dimmer is unresponsive:
- Check the remote’s battery and replace it if necessary.
- Ensure there are no obstructions between the remote and the IR receiver.
- If using an RF remote, try controlling the lights from different distances and angles.
- Test with a different remote (if available) to see if the original one is faulty.
5. Reset the LED Strip Controller
Some LED controllers may malfunction due to software glitches. Resetting the controller can restore its functionality:
- Unplug the LED strip controller from the power source.
- Press and hold the reset button (if available) on the controller for 5-10 seconds.
- Reconnect the controller to power and test the LED strip lights.
6. Check for Signal Interference
- If your LED strip controller uses an RF remote, nearby electronic devices may interfere with its signal.
- Try moving the controller to a different location, away from strong electronic signals such as Wi-Fi routers or Bluetooth devices.
- Change the frequency of the controller (if possible) to reduce interference.
7. Replace or Upgrade the Controller
- If none of the troubleshooting steps resolve the issue, the LED strip controller may be defective. Consider replacing it with a new unit.
- Ensure the replacement controller is compatible with your LED strip’s voltage and color type (RGB, RGBW, or single color).
- Upgrade to a smart controller that allows app or voice control for more reliable performance.

Preventative Maintenance Tips
To extend the lifespan of your LED strip controller and avoid future failures, follow these maintenance tips:
- Use a surge protector: Power surges can damage controllers and power adapters.
- Avoid overloading: Ensure the power supply matches the wattage requirements of your LED strip lights.
- Keep the controller ventilated: Prevent overheating by placing the controller in a well-ventilated area.
- Regularly check connections: Periodically inspect wires and connectors for wear or loosening.
- Use quality components: Invest in high-quality LED strips, controllers, and power supplies to reduce failure risks.
Conclusion
Diagnosing and fixing LED strip controller failures doesn’t have to be complicated. By following a systematic approach—checking the power supply, inspecting connections, testing components separately, and resetting the controller—you can quickly identify and resolve most issues. If the controller is beyond repair, upgrading to a high-quality replacement ensures long-term reliability. Proper maintenance will also help prevent future failures, keeping your LED strip lights shining brightly for years to come.
About HitLights:
HitLights is a leading provider of high-quality LED lighting and low voltage LED drivers, and mounting supplies catering to diverse needs in residential, commercial, and event settings. With a commitment to innovation, eco-friendly lighting, and customer satisfaction, HitLights continues to illuminate spaces with innovations be it micro or macro technology.
By the way, if you are a professional installer, an integrator, or a business owner and you want to: Save MORE! And Do MORE Projects!
Get Factory Direct Pricing when you join our Professional Partner Program RISK-FREE, NO CONTRACTS, NO HASSLE PROCESS there is nothing to lose but MORE to GAIN!
If you have any additional questions, feel free to reach out to us at customerservice@hitlights.com or give us a call at 1 (855) 768-4135. Our team of expert engineers and electricians are here to assist you every step of the way!
*Disclaimer: The information provided in this article is for general informational purposes only.
