
- Why LED Strips Belong in the Design Plan, Not the Electrician's Afterthought
- The Three Specs That Actually Matter to a Design Outcome
- Designing in Layers: Ambient, Task, Accent
- Specifying by Room Type
- Specifying for the Client Conversation
- Documentation: What to Request From Your Supplier
- What to Avoid
- A Case Walkthrough: Specifying a Primary Suite Renovation
- Working with a Factory-Direct Partner on Multi-Unit Trade Projects
- Frequently Asked Questions
Lighting is the one material in a design plan that changes everything else in the room — the paint color that read warm in the showroom, the stone countertop that looked flawless on the sample board, the upholstery that matched the mood board perfectly. All of it lives or dies under the wrong light. For interior designers, LED strip lighting isn't a utility add-on specified at the end of a project; it's a design material that needs to be chosen with the same intention as fabric, finish, or furniture.
This guide covers how to think about LED strip lighting the way a lighting designer does — as a layered system, specified by color accuracy, color temperature, and placement, not just "turn the room on." It also covers the practical side: what to ask a supplier for, how to document a spec for a client or contractor, and how to avoid the handful of mistakes that quietly undermine an otherwise well-designed room.
Why LED Strips Belong in the Design Plan, Not the Electrician's Afterthought
Traditional fixtures light a room. LED strips shape it. Because strips can be mounted almost anywhere — inside a cove, behind a headboard, under a floating shelf, along a stair riser — they let a designer control exactly where light falls and exactly where it doesn't. That control is what separates a space that feels professionally designed from one that simply has enough light in it.
The risk: when strip lighting is treated as a last-minute electrical add, designers lose that control. The electrician defaults to whatever strip is on hand, in whatever color temperature was last ordered, and the carefully chosen palette gets read under light nobody specified on purpose. This is the single most common way a well-designed room underperforms once construction is finished — not because the design was wrong, but because the lighting spec was never actually treated as part of the design.
The fix is procedural as much as aesthetic: lighting should appear on the same spec sheet as flooring, paint, and fixtures, with the same level of named detail — voltage, CRI, CCT, and placement — rather than a general note that says "LED strip lighting throughout."
The Three Specs That Actually Matter to a Design Outcome
CRI (Color Rendering Index). This is the single most design-relevant spec on any LED strip, and the one most likely to get skipped. CRI measures how accurately a light source renders color compared to natural daylight, on a 0–100 scale. A CRI 80 strip — still common in budget product — will make a carefully chosen warm white paint look slightly grey and flat. CRI 90+ renders that same paint, along with skin tones, wood grain, and fabric, the way it was actually selected to look. For any space a client will actually look at closely — living rooms, primary suites, dining areas — CRI 90+ should be the floor, not the upgrade.
The practical test: hold a fabric swatch or paint chip under a CRI 80 strip and the same swatch under a CRI 90+ strip side by side. Reds and warm skin tones are usually where the difference is most visible — CRI 80 light tends to mute reds and give skin a slightly sallow cast, which is exactly the kind of thing a client notices without being able to say why a space feels "off."
CCT (Color Temperature). Measured in Kelvin, this determines whether light reads warm, neutral, or cool. For a deeper breakdown of exactly how each Kelvin range reads in a real room, see our color temperature guide, but the working rules for design specification are:
- 2700K matches traditional incandescent warmth and suits bedrooms, living rooms, and any space meant to feel relaxed in the evening.
- 3000K is a versatile, slightly brighter warm-neutral that works across most residential rooms without feeling clinical.
- 3500K sits between warm and neutral — a good transition choice for open floor plans connecting a warm living space to a brighter kitchen.
- 4000K reads clean and modern — right for kitchens and bathrooms where task clarity matters more than coziness.
Mixing color temperatures across a floor plan without intention is one of the fastest ways to make a cohesive design read disjointed room to room. If a project genuinely needs different CCTs in adjoining spaces, plan a visual transition — a hallway, a change in ceiling height, a doorway — rather than letting two different color temperatures meet at an open sightline.
Voltage and Dimming Compatibility. 24V strips generally give smoother, more flicker-free dimming at low output than 12V, which matters enormously in spaces where a designer wants a slow dim-to-warm effect for evening ambiance. Specifying the strip without specifying a matched dimmer is a common failure point — a mismatched dimmer produces flicker or a dead zone at the low end of the dimming curve, undermining the exact mood the lighting was meant to create. For guidance on exactly which dimmer type pairs correctly with which driver, see our dimmer compatibility guide — it's worth reviewing before finalizing any spec that includes dimming, since this is the single most common installation callback on designer-specified lighting.
Designing in Layers: Ambient, Task, Accent
Professional lighting design works in three layers, and LED strips can serve all three within a single room. Our layered lighting guide covers the full framework in depth; the summary relevant to strip specification is:
- Ambient — general room illumination, often from cove or perimeter strips bounced off the ceiling for soft, even light with no visible source. This is the layer that sets the base mood of a room and should almost always be on its own dimmer circuit, independent of task and accent layers.
- Task — focused light for a specific activity: under-cabinet strips in a kitchen, strip lighting inside a closet or vanity mirror surround. Task layers typically need higher CRI and brighter output than ambient, since they're doing functional work (reading, grooming, food prep) rather than setting mood.
- Accent — strips used to highlight architectural detail, artwork, or a feature wall, typically at lower output and often warmer in tone than the ambient layer. Accent lighting is where strip placement creativity really shows — behind a headboard, inside a display cabinet, along a ceiling cove edge.
A room with only ambient lighting feels flat under a camera and in person. A room layered correctly — ambient for base light, task where function demands it, accent to create depth — is what reads as "designed" rather than "lit." Most of the rooms that photograph well for a portfolio achieve that specifically through layering, not through any single dramatic fixture.
Specifying by Room Type
Different rooms call for different combinations of the specs above. A quick reference for common residential and light-commercial spaces:
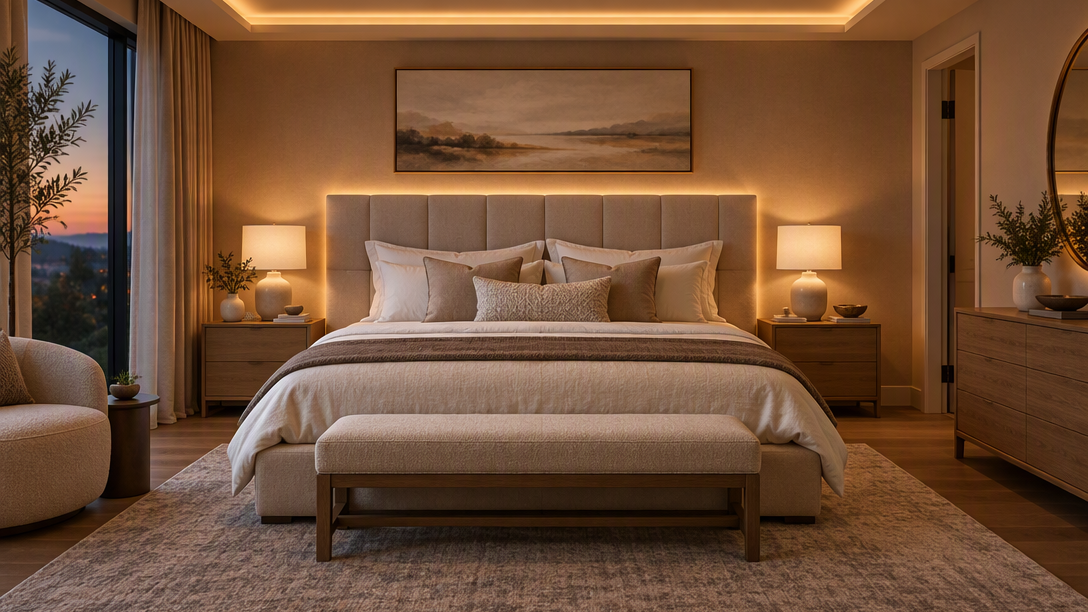
Primary Bedroom. 2700K, CRI 90+, 24V for smooth dimming. Ambient layer from a cove or ceiling perimeter; accent layer behind the headboard on its own dimmer for a hotel-style evening glow. This is one of the rooms where dim-to-warm performance matters most — clients notice a harsh, flickering dim far more in a bedroom than anywhere else in the home.
Kitchen. 3000K–4000K depending on the overall palette, CRI 90+ non-negotiable (food and countertop materials both read poorly under lower CRI). Task layer under cabinets is the priority; toe-kick accent lighting is a strong secondary layer if the design calls for a "floating cabinet" look.
Bathroom / Vanity. 3000K–4000K, CRI 90+, and confirm IP rating matches any moisture exposure — a strip mounted near a vanity mirror in a steamy bathroom needs at minimum a damp-location rating. This is a spec detail that's easy to miss when a project is moving fast.
Living / Family Room. 2700K–3000K, CRI 90+. Almost entirely ambient and accent layering — cove lighting, behind-TV backlighting, built-in shelving accents. Dimming control matters here more than raw brightness, since this room's lighting needs change constantly between daytime, evening entertaining, and movie-watching.
Home Office. 3500K–4000K for task clarity during work hours, with CRI 90+ if video calls are a regular part of the room's use — poor CRI is very noticeable on camera, often more than in person.
Light-Commercial / Boutique Retail. 3000K–4000K depending on brand positioning, CRI 90+ is close to mandatory since merchandise color accuracy directly affects perceived quality and sales. UL Listing becomes a compliance requirement rather than a nice-to-have at this point — confirm this explicitly in the spec, since commercial permitting will ask for it.
Specifying for the Client Conversation
When presenting lighting choices to a client, translate the specs into outcomes rather than numbers:
- "We're using a 90+ CRI strip so the wood tones in this room read true in person and in photos."
- "This area uses a 2700K strip to keep the space feeling warm in the evening, paired with a dimmer so it can shift from daytime bright to evening ambiance."
- "We're layering a cove strip for soft overall light with a lower accent strip behind the headboard for a hotel-style glow."
This framing does two things: it justifies the premium of a higher-CRI, better-engineered strip, and it signals the same level of intention clients already expect from fabric and finish selections. It also gives the client language to use when a contractor or electrician proposes a substitution later in the project — "we specified CRI 90+ for this room" is a much stronger pushback than a vague preference.
Documentation: What to Request From Your Supplier
A spec that lives only in a designer's head doesn't survive contact with a general contractor or electrician on a tight schedule. For every strip specified on a project, request and retain:
- A spec sheet confirming CRI, CCT options, voltage, wattage per foot, and IP rating
- UL Listing documentation if the project will need permit sign-off
- Confirmed lead time and minimum order quantity if the spec needs to be replicated across multiple units (a multifamily project, a hospitality portfolio, a retail rollout)
- A matched driver and dimmer recommendation from the supplier, rather than assuming any dimmer will work with any driver
Working with a factory-direct supplier rather than a generic distributor makes this documentation step easier — a factory-direct source can usually confirm exact current specs and lead times without the extra step of checking with an upstream manufacturer.
What to Avoid
- Specifying strip voltage and dimmer separately without confirming compatibility — mismatches cause flicker that undermines the finished look.
- Mixing CCT across adjoining rooms without a transition plan — a 2700K living room next to a 4000K kitchen with no buffer reads as two different projects.
- Treating CRI as optional on budget-conscious projects — a 10–15% premium on strip cost is far cheaper than a client-requested redo after installation.
- Leaving the final strip and driver selection to whoever is on-site during installation, rather than documenting the spec in writing ahead of time.
A Case Walkthrough: Specifying a Primary Suite Renovation
To see the framework in action, consider a common trade scenario: a primary suite renovation that includes a redesigned bedroom, an ensuite bathroom, and a walk-in closet, all visible from one another through open doorways.
The bedroom gets a 2700K, CRI 90+, 24V cove strip around the ceiling perimeter for ambient light, plus a lower-output 2700K accent strip behind the headboard on its own dimmer circuit. The ensuite bathroom steps up to 3500K for a cleaner, more task-appropriate feel at the vanity, still at CRI 90+, with an IP-rated strip around the mirror given the humidity exposure. The closet uses a brighter 4000K strip for true color rendering when selecting clothing, since this is a pure task space with no ambiance requirement.
The transition point — the doorway between bedroom and bathroom — is where the CCT shift from 2700K to 3500K actually happens, rather than letting the two color temperatures compete across an open sightline. This is the kind of detail that separates a coordinated three-room lighting plan from three rooms that each look fine individually but feel disconnected walking between them.
Documented this way, the electrician receives three distinct specs instead of one vague instruction, and the designer has a clear reference to resolve any on-site substitution questions without a site visit.
Working with a Factory-Direct Partner on Multi-Unit Trade Projects
For designers working on multifamily, hospitality, or multi-unit residential projects, the same spec typically needs to repeat across dozens or hundreds of units with zero variation — a single CCT or CRI inconsistency between unit 4B and unit 12A is the kind of thing that gets noticed during a final walkthrough.
This is where sourcing matters as much as the spec itself. A factory-direct supplier can typically confirm, in writing, that every reel shipped for a project comes from the same production run and CCT bin — important because LED chips can vary slightly in color temperature batch to batch, even within a labeled Kelvin range. For large trade orders, it's worth asking explicitly:
- Can the full project quantity be fulfilled from a single production run, or will it ship across multiple batches?
- What is the confirmed lead time for the full order, not just a sample quantity?
- Is wholesale or trade account pricing available for projects of this scale?
Getting these answers before finalizing a spec avoids the scenario where a project is two-thirds installed and the remaining units ship with a visibly different color temperature than what's already in place.
Frequently Asked Questions
What CRI should I specify for a residential project by default?
CRI 90+ should be the default for any space a client will look at closely — living areas, bedrooms, kitchens, bathrooms. CRI 80 is only acceptable in true back-of-house or utility spaces like a garage or unfinished basement.
Can I mix 12V and 24V strips in the same project?
Yes, as long as each strip is paired with its own correctly rated driver — the two voltages should never share a single power supply. Many designers use 12V for shorter accent runs and 24V for longer ambient or task runs where voltage drop is more of a concern.
How do I know if a dimmer will work with a specific strip?
Confirm the dimming method (PWM, 0-10V, or TRIAC) that both the driver and dimmer explicitly support — "dimmable" alone isn't enough information. When in doubt, request a matched driver-and-dimmer recommendation directly from the strip supplier rather than guessing.
Should I specify the same CCT throughout an entire open-plan home?
Not necessarily — but any CCT change should happen at a logical transition point (a hallway, a change in ceiling plane, a doorway) rather than across an open sightline where two color temperatures are visible at once. Plan the transition deliberately rather than letting it happen by accident between two separately-specified rooms.
What's the risk of using a non-factory-direct or unverified strip source for a multi-unit project?
The biggest practical risk is batch-to-batch CCT or CRI inconsistency, which is far more noticeable at scale than on a single-room job. A supplier who can confirm single-run fulfillment and provide documentation reduces this risk significantly compared to sourcing from a reseller who may be blending inventory from multiple manufacturing batches.
Shop UL-Listed, High-CRI LED Strips for Design-Grade Projects
Factory-direct pricing for design and trade accounts. Shop CRI 90+ LED strips.