- What Are LED Strip Lights?
- Why You Might Need to Cut LED Strip Lights
- Tools You Need to Cut LED Strip Lights Safely
- How to Identify the Cut Lines on LED Strip Lights
- Step-by-Step Guide: How to Cut LED Strip Lights
- How to Reconnect LED Strip Lights After Cutting
- Common Mistakes to Avoid When Cutting LED Strip Lights
- Expert Tips for a Seamless LED Strip Light Installation
- FAQs About Cutting LED Strip Lights
- Conclusion
How to Cut LED Strip Lights: A Step-by-Step Guide for DIY Success
LED strip lights have become a popular choice for home improvement, DIY projects, and mood lighting solutions. Their flexibility, affordability, and energy efficiency make them ideal for under-cabinet lighting, accent walls, gaming setups, and more. But what if the strip is too long for your space? Knowing how to cut LED strip lights safely and properly is essential to achieving a clean and professional look.
In this comprehensive guide, we’ll walk you through every step of cutting and reconnecting LED strip lights—without damaging them. Whether you're a first-time DIYer or an experienced installer, this article will provide everything you need to know.
What Are LED Strip Lights?
LED strip lights, also known as LED tape lights or ribbon lights, are flexible circuit boards populated with light-emitting diodes (LEDs). These strips come with adhesive backing, making them easy to install on various surfaces, including walls, ceilings, furniture, and more.
There are different types of LED strip lights, including:
-
Single-color strips (e.g., warm white, cool white)
-
RGB strips (capable of producing millions of colors)
-
RGBIC strips (individually addressable LEDs for dynamic effects)
-
Smart strips (WiFi or Bluetooth enabled)
They typically operate on low-voltage DC power, making them safe to use and customize, including cutting them to fit specific dimensions.
Why You Might Need to Cut LED Strip Lights
Understanding why and when to cut LED strip lights helps you avoid mistakes and maximize their utility. Here are common scenarios:
-
Fitting a custom length for cabinets, shelves, or staircases
-
Removing excess length to eliminate clutter or sagging
-
Splitting one strip into multiple sections for different areas
-
Rewiring a section that stopped working
Fortunately, most high-quality LED strips are designed to be cut safely, as long as it’s done correctly.
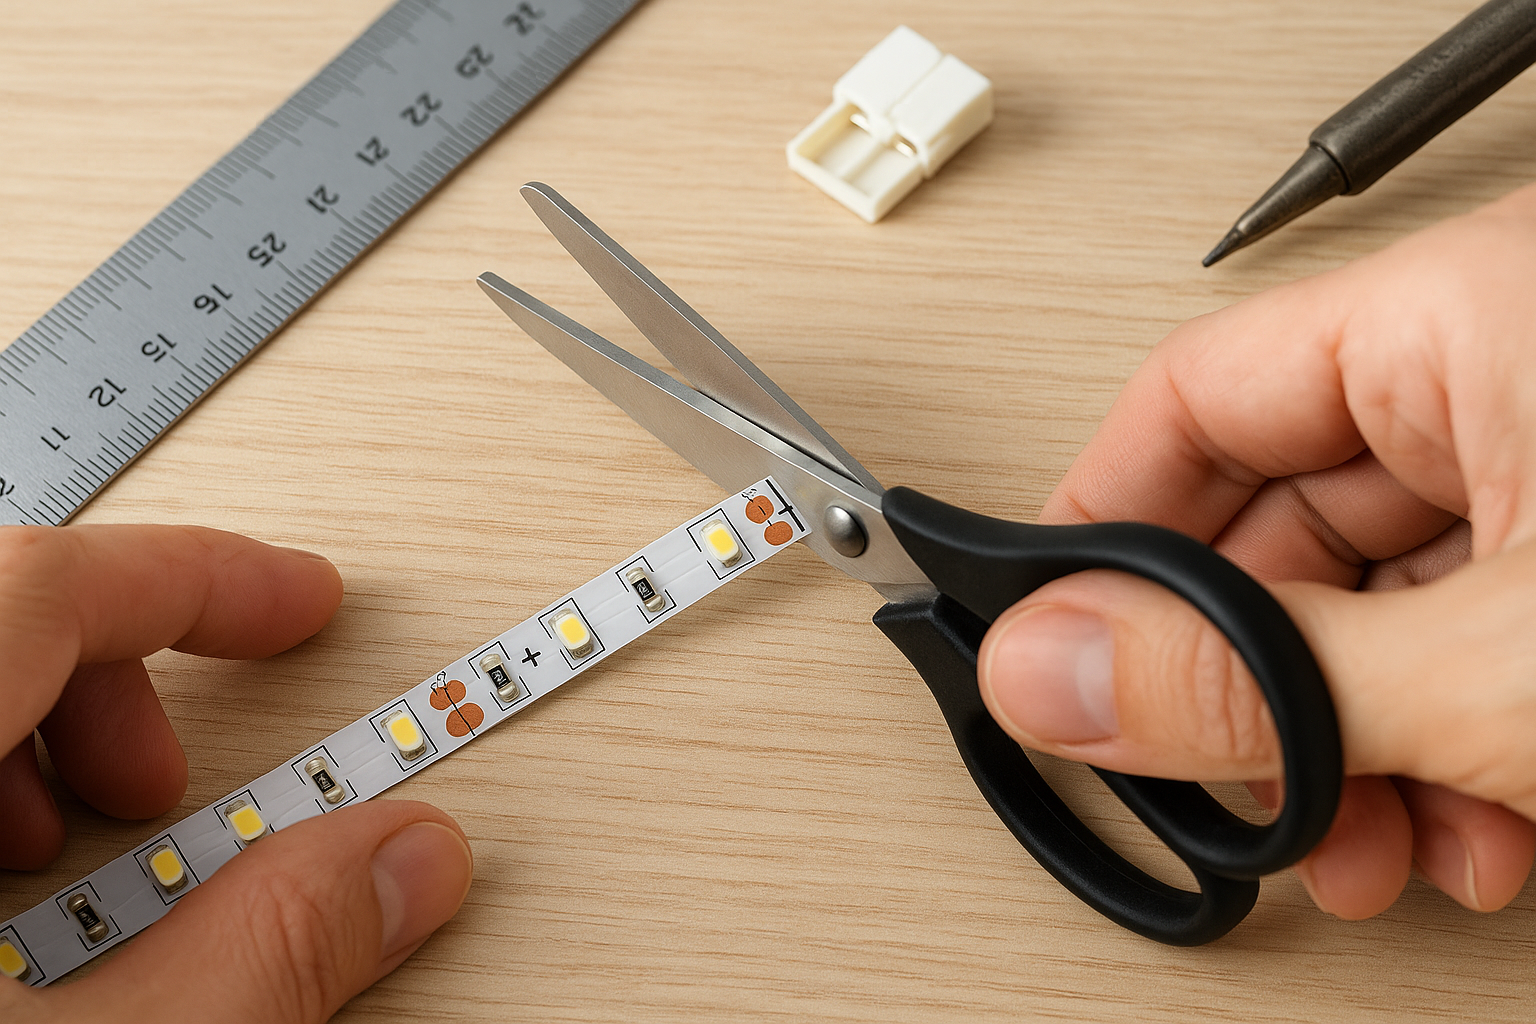
Tools You Need to Cut LED Strip Lights Safely
Before diving into the process, gather the essential tools. Having the right equipment ensures a clean cut and reduces the risk of damaging the strip.
Essential Tools:
-
Sharp scissors or hobby knife (precision is key)
-
Soldering iron and solder (for reconnection, optional)
-
Wire cutters/strippers (if you plan to wire the ends)
-
LED connectors (for solder-free reconnections)
-
Multimeter (to test continuity after cutting)
-
Heat shrink tubing or electrical tape (to insulate exposed wires)
Optional but helpful:
-
Tweezers (to handle small components)
-
Ruler or measuring tape (for precise cuts)
-
Helping hands tool (for steady soldering work)
How to Identify the Cut Lines on LED Strip Lights
Not all sections of an LED strip are created equal. Manufacturers design specific areas where strips can be safely cut—known as “cut lines.”
How to Find the Cut Marks:
-
Look for copper pads or scissor icons printed along the strip.
-
Cut only on these marked lines—typically spaced every 1 to 2 inches depending on the strip type.
-
Cutting outside these lines will likely break the circuit and render the section unusable.
💡 Pro Tip: Count the number of LEDs between cut lines to estimate where your cuts will land relative to your project dimensions.
Step-by-Step Guide: How to Cut LED Strip Lights
Here’s the process for cutting your LED strip lights like a pro:
Step 1: Power Down
Always unplug or disconnect power from the strip to prevent electric shock or short circuits.
Step 2: Measure and Mark
Use a ruler to determine the exact location you want to cut.
Double-check that your chosen point is on a marked cut line.
Step 3: Make the Cut
Using sharp scissors or a precision blade, carefully cut along the designated line.
Apply gentle, even pressure to avoid damaging adjacent components.
Step 4: Inspect the Cut
Ensure the copper pads remain intact on both ends of the strip. These will be essential for reconnection.
How to Reconnect LED Strip Lights After Cutting
Once you’ve cut the strip, you may need to reconnect it—either to another section, a power supply, or a controller. There are two primary methods:
Method 1: Using LED Connectors (No Soldering)
-
Purchase connectors that match your strip type (2-pin, 4-pin, or 5-pin).
-
Open the connector clip, align the copper pads with the terminals, and snap it shut.
-
Ensure a snug and aligned fit for consistent performance.
Method 2: Soldering the Wires
-
Strip a small section of wire (same number of wires as the strip channels).
-
Apply a small amount of solder to the copper pads and wire tips.
-
Connect corresponding channels (e.g., +, R, G, B) using a soldering iron.
-
Use heat shrink tubing or electrical tape to cover exposed solder joints.
💡 Expert Insight: Soldering offers a more secure and permanent connection, ideal for outdoor or high-movement installations.
Common Mistakes to Avoid When Cutting LED Strip Lights
Even seasoned DIYers can make errors. Avoid these common pitfalls:
- ❌ Cutting between the copper pads, which breaks the circuit.
- ❌ Forgetting to power off the strip before handling.
- ❌ Mismatching connectors, resulting in signal or power loss.
- ❌ Twisting or bending the strip too close to the cut line.
- ❌ Using dull scissors, which can tear the circuit board.
Expert Tips for a Seamless LED Strip Light Installation
- ✅ Test strips before final installation
- ✅ Mount on clean, dry surfaces
- ✅ Use diffusers for heat and aesthetics
- ✅ Plan the layout ahead of time
- ✅ Use dimmers or smart controllers for control
FAQs About Cutting LED Strip Lights
Can I cut LED strip lights anywhere?
No, LED strip lights can only be cut at specific intervals marked by copper pads or scissor icons. Cutting anywhere else may damage the circuit and render the strip unusable.
What happens if I cut in the wrong place?
If you cut outside the designated line, you may break the electrical circuit. This will likely prevent that section of the strip from functioning unless it is expertly repaired through soldering.
Do I need special tools to cut LED strip lights?
Not necessarily. A sharp pair of scissors or a hobby knife is usually sufficient. However, if you plan to reconnect the strips, tools like a soldering iron, LED connectors, or wire strippers are highly recommended.
Can I reconnect LED strip lights after cutting them?
Yes. You can reconnect cut sections using solder-free connectors or by soldering wires to the copper pads. Be sure to match the correct polarity and channel configuration (+, R, G, B, etc.).
Will cutting the strip affect the brightness or performance?
Cutting the strip at proper intervals will not affect performance. However, if the power supply is inadequate or the connections are loose, brightness may suffer due to voltage drop.
Is it safe to cut waterproof LED strip lights?
Yes, but after cutting, you must reseal the exposed ends with waterproof silicone, heat shrink tubing, or end caps to maintain the IP rating and prevent water ingress.
How do I know if my LED strip is single-color or RGB?
Check the number of copper pads at the cut lines: 2 pads = Single color; 4 pads = RGB; 5 pads or more = RGBW or RGBIC.
Can I use one power supply for multiple cut sections?
Yes, as long as the total wattage of all connected strips does not exceed the output capacity of your power supply. Use a power distribution method that ensures even voltage delivery across all sections.
Do I need a controller for each cut section?
Not necessarily. If you reconnect sections properly, they can all be controlled by a single controller. If you plan to operate them independently, then individual controllers may be needed.
Conclusion
Cutting LED strip lights may seem intimidating at first, but with the right tools, preparation, and guidance, it’s a straightforward process. By following the steps outlined in this guide, you can safely and effectively customize your lighting setup to fit any space or project.
Whether you're trimming a few inches for an under-cabinet light or splicing multiple segments for a room transformation, knowing how to cut LED strip lights properly ensures your final result is both functional and visually appealing.
