
- Under-Cabinet vs. Toe-Kick: Different Jobs, Different Specs
- Mounting Position: Where the Strip Actually Goes
- Handling Corners and Seams Without Visible Gaps
- A Worked Example: A U-Shaped Kitchen Layout
- Power and Wiring Considerations Specific to Kitchens
- Dimming and Control for Kitchen Lighting
- Sequencing the Install: Cabinet Maker, Electrician, or Both
- New Construction vs. Retrofit Considerations
- Material and Finish Considerations
- Coordinating Multiple Trades on a Larger Renovation
- Common Mistakes in Cabinet and Toe-Kick Layout
- A Pre-Order Checklist for Cabinet and Toe-Kick Projects
- Budgeting for a Multi-Kitchen or Builder Program
- Putting It All Together
- Frequently Asked Questions
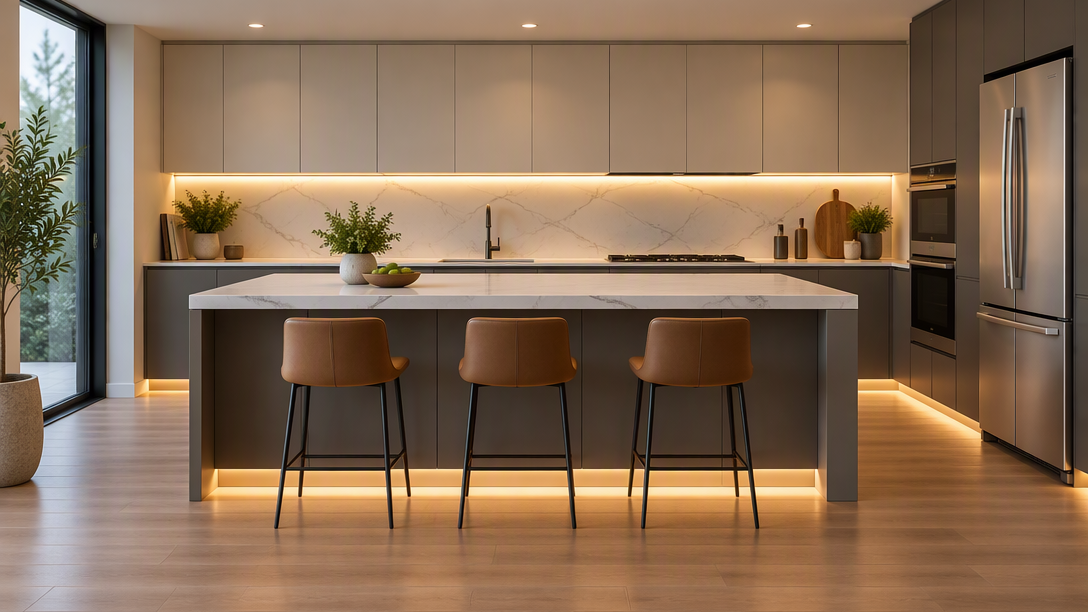
Under-cabinet and toe-kick LED lighting looks simple in a showroom photo — a clean glow under the upper cabinets, a soft line of light along the floor. Getting that same clean result in an actual kitchen install depends on a handful of layout decisions that aren't obvious until you're standing in the space with a tape measure: where exactly to mount the strip, how to handle corners and seams, which CCT and CRI actually make food and countertops look right, and how to keep wiring invisible without compromising access for repairs. These decisions compound — a mounting choice made early in the design process can lock in a problem that's expensive to fix once cabinetry is installed and finished.
This guide walks through those decisions for cabinet makers, kitchen designers, and contractors specifying under-cabinet and toe-kick lighting for a real project, not just a photo — covering mounting position, corner handling, power and moisture considerations, trade sequencing between cabinetry and electrical work, and what changes when the same layout needs to repeat consistently across a multi-kitchen builder program. Whether you're specifying one kitchen or standardizing a spec across dozens of identical units, the same underlying principles apply.
Under-Cabinet vs. Toe-Kick: Different Jobs, Different Specs
These two zones often get specified as if they're the same decision, but they serve different functions and benefit from different specs.
Under-cabinet lighting is task lighting — it illuminates the countertop for food prep, reading recipes, and close work. This zone benefits from higher CRI (90+) and a cooler, more task-appropriate CCT (3000-4000K), since color accuracy on food and countertop surfaces genuinely matters here.
Toe-kick lighting is primarily ambient and wayfinding — a soft glow along the floor, often used at night for safe movement through a kitchen without turning on full overhead lighting. This zone can run a warmer CCT (2700-3000K) at lower output, since its job is gentle visibility rather than task illumination.
Specifying both zones with the same CCT and brightness is a common mistake that results in either an under-cabinet zone that's too dim for real task use, or a toe-kick zone that's uncomfortably bright for a 2am kitchen walk-through.
Mounting Position: Where the Strip Actually Goes
For under-cabinet lighting, mount the strip toward the front edge of the cabinet bottom, not centered or toward the back wall. A front-mounted strip throws light forward onto the counter's working surface; a back-mounted strip mostly illuminates the backsplash and leaves the actual work surface comparatively dim. Use a diffusion channel or aluminum profile rather than mounting the bare strip directly — this spreads the light more evenly and avoids visible hot spots from individual LED chips, particularly with SMD strips at standard density.
For toe-kick lighting, mount the strip within a recessed channel set back from the toe-kick's front face, angled slightly downward if the profile allows. This keeps the light source itself out of direct view while still casting a visible glow — a strip mounted flush with no recess tends to create glare when viewed at a normal standing angle, which undermines the soft ambient effect the zone is meant to provide.
Handling Corners and Seams Without Visible Gaps
Cabinet runs rarely go in one straight, unbroken line — inside corners, outside corners, and gaps between cabinet sections all need a plan before ordering strip length. A few practical approaches:
- Corner connectors designed for the specific aluminum channel being used, rather than simply bending the strip at a sharp angle (which can damage the circuit board inside standard strip, especially at tight corners).
- Dedicated short runs per cabinet section with separate connections, rather than one continuous run forced around every corner — this also makes future repair easier, since a failed section can be isolated and replaced without disturbing the whole run.
- Light-blocking end caps at any point where a run terminates mid-visible-run, to avoid an abrupt bright spot at the strip's physical end.
Planning corner and seam handling before ordering avoids the common on-site problem of running out of strip mid-corner, or discovering a sharp-angle bend has already damaged a section during installation.
A Worked Example: A U-Shaped Kitchen Layout
Consider a U-shaped kitchen with three distinct cabinet runs under the upper cabinets, plus a continuous toe-kick run along the same three walls. Rather than ordering one long strip and cutting it on-site to fit, measure each of the three under-cabinet runs individually, order pre-cut or cut-to-length sections for each, and use corner connectors rated for the actual aluminum channel at each of the two inside corners.
For the toe-kick run, the same three-wall layout applies, but toe-kick corners are typically tighter and lower to the floor than upper-cabinet corners, so confirm the corner connector or bending radius is rated for the toe-kick channel specifically — a connector rated for the wider under-cabinet channel may not fit or perform correctly in the narrower toe-kick profile.
Power and Wiring Considerations Specific to Kitchens
Kitchens present two wiring considerations worth planning for explicitly: moisture exposure near sinks and dishwashers, and the need to keep driver and connection points accessible for future service without requiring cabinet disassembly.
For moisture exposure, specify at minimum IP65-rated strip and connectors for any under-cabinet run near a sink, and confirm the driver itself is mounted in a dry, accessible location — typically inside a cabinet interior rather than exposed. For toe-kick runs, moisture exposure from mopping or spills is a real consideration even in kitchens without a nearby sink, so the same IP65 recommendation generally applies there as well.
For driver placement, mount it somewhere a future service call can access without removing cabinet faces or drawers — inside a nearby base cabinet with a simple access panel is a common, effective approach. Our guide on how to connect LED strip lights covers the basic connection principles that apply here, scaled down from the commercial-run context to a single-kitchen installation.
Dimming and Control for Kitchen Lighting
Under-cabinet and toe-kick zones typically benefit from independent dimming or at minimum independent switching, since they're used at different times for different purposes — full-brightness under-cabinet lighting during active cooking, and low-level toe-kick lighting alone during a late-night kitchen visit. Confirm the chosen driver and control method supports this zone separation; defaulting both zones to one shared switch or dimmer circuit removes flexibility that most kitchen users actually want once they're living with the space day to day.
For more on matching color temperature choices across connected spaces — relevant if the kitchen opens into a dining or living area — see our guide to planning color temperature across multiple rooms.
Sequencing the Install: Cabinet Maker, Electrician, or Both
Under-cabinet and toe-kick lighting sits at the intersection of cabinetry and electrical work, and getting the sequencing wrong is a common source of rework. The aluminum channel and diffusion profile are typically installed as part of the cabinetry work, before or during cabinet installation, while the actual strip, wiring, and driver connection usually happen after cabinets are set but before final trim and backsplash work closes up access to the wiring path.
The practical coordination point: confirm with whoever is building or installing the cabinetry that channel mounting points and any wire pass-through holes are planned before the cabinets go in, not improvised afterward. A cabinet maker who knows in advance exactly where the lighting channel needs to sit can build that into the cabinet construction cleanly; retrofitting a channel into already-installed cabinetry is possible but usually looks less finished and takes meaningfully longer on-site.
New Construction vs. Retrofit Considerations
For new construction or a full cabinet replacement, integrating the lighting channel into the cabinet design from the start gives the cleanest result — the channel can be built into the cabinet's own construction rather than added as a visible retrofit element. Specify this with your cabinet maker at the design stage, including exact channel dimensions and wire pass-through locations, so the cabinetry and lighting plans develop together rather than the lighting being an afterthought fitted into a finished cabinet design.
For a retrofit onto existing cabinetry, the main constraint is usually how to run wiring without opening up finished walls or cabinet backs. Surface-mounted channels along the existing cabinet bottom are the most common retrofit approach, accepting a slightly less seamless look than a fully integrated new-construction channel in exchange for avoiding major cabinet disassembly. Battery-powered or plug-in options exist for a retrofit where running permanent wiring isn't practical at all, though these come with real tradeoffs in brightness consistency and long-term reliability compared to a hardwired installation — reserve them for genuinely temporary or rental situations rather than a permanent kitchen upgrade.
Material and Finish Considerations
The aluminum channel's finish affects both appearance and how well it diffuses light. A frosted or opal diffusion lens typically produces smoother, less dotted light output than a clear lens, which matters more with standard SMD strip than with COB — see our COB vs. SMD guide if close-viewing-distance dot visibility is a concern for an especially visible under-cabinet run, such as open shelving rather than fully enclosed upper cabinets.
Channel color (typically silver/natural aluminum, white, or black) should generally match or complement the cabinet hardware and trim finish rather than being selected independently — a mismatched channel finish is a small detail that nonetheless stands out in an otherwise carefully finished kitchen, particularly in cabinetry work where finish consistency is part of the overall design quality being delivered.
Coordinating Multiple Trades on a Larger Renovation
On a full kitchen renovation involving a cabinet maker, an electrician, and sometimes a separate designer, under-cabinet and toe-kick lighting is exactly the kind of detail that falls through the cracks without clear ownership. Assign one party — often the designer or general contractor coordinating the project — responsibility for confirming the final lighting spec (CCT, CRI, IP rating, channel dimensions, switching plan) is communicated identically to both the cabinet maker and the electrician before either starts their portion of the work. A spec that reaches one trade but not the other is a common, avoidable cause of on-site improvisation that doesn't match the original design intent.
Common Mistakes in Cabinet and Toe-Kick Layout
- Mounting under-cabinet strip toward the back of the cabinet instead of the front edge, leaving the work surface dim
- Using the same CCT and brightness for both under-cabinet and toe-kick zones instead of specifying each for its actual function
- Forcing a continuous strip around a sharp corner instead of using a rated corner connector, risking circuit board damage
- Mounting a driver somewhere inaccessible for future service, requiring cabinet disassembly for a simple repair
- Skipping IP65 moisture protection near sinks or on toe-kick runs exposed to mopping and spills
- Wiring both zones to one shared switch, removing the flexibility most kitchen users actually want
A Pre-Order Checklist for Cabinet and Toe-Kick Projects
- Measure each cabinet run individually rather than estimating one total length for the whole kitchen.
- Specify CCT and CRI separately for under-cabinet (task) versus toe-kick (ambient) zones.
- Confirm corner connector compatibility with the specific aluminum channel used in each zone.
- Plan driver placement for future accessibility before installation begins.
- Specify IP65 or higher for any run near moisture exposure.
- Confirm independent switching or dimming for under-cabinet and toe-kick zones.
Budgeting for a Multi-Kitchen or Builder Program
For a cabinet maker or builder specifying the same lighting layout across multiple kitchens — a production home builder or a multi-unit renovation — the same batch-consistency and bulk-pricing principles that apply to any multi-unit LED order apply here too. Confirm with your supplier whether the full order across all kitchens ships from a consistent batch, and calculate total footage across every kitchen in the program before requesting a quote, rather than pricing kitchen by kitchen. See our guide on bulk LED strip pricing for the volume-tier math that applies at this scale.
For a builder program specifically, standardizing on one consistent channel, CCT, and CRI spec across every unit — rather than letting each kitchen's design evolve independently — also simplifies both procurement and future warranty or replacement support, since every installed kitchen uses the identical, documented spec.
Putting It All Together
Good under-cabinet and toe-kick lighting comes down to treating each zone's function seriously rather than defaulting to a single generic spec for the whole kitchen. Under-cabinet lighting earns its keep as genuine task lighting when it's mounted correctly, specified with the right CRI and CCT, and powered through an accessible driver. Toe-kick lighting earns its keep as ambient wayfinding when it's recessed properly and switched independently from the task zone above it.
Cabinet makers and designers who build these decisions into the project plan from the start — not as an afterthought once cabinetry is already installed — consistently deliver a cleaner, more functional result than teams improvising lighting details on-site after the fact. The small amount of upfront planning covered in this guide is what separates a kitchen lighting install that looks good in a showroom photo from one that actually works well for the people cooking in it every day. That difference tends to be exactly what clients notice and remember, long after the specific brand of strip used has been forgotten.
Frequently Asked Questions
Should under-cabinet and toe-kick lighting use the same color temperature?
Generally no — under-cabinet lighting benefits from a cooler, task-appropriate CCT for food prep accuracy, while toe-kick lighting can run warmer at lower output since its job is gentle ambient visibility rather than task illumination.
Where should under-cabinet LED strip actually be mounted?
Toward the front edge of the cabinet bottom, not centered or toward the back wall. Front-mounting throws light forward onto the counter's working surface, which is the point of the zone.
Can I bend LED strip around a tight corner instead of using a connector?
It's generally not recommended for sharp corners — bending standard strip too tightly can damage the circuit board inside. A corner connector rated for the specific channel being used is the more reliable approach.
Do toe-kick and under-cabinet lighting need to be on separate switches?
It's strongly recommended. They're used at different times for different purposes, and independent control gives the kitchen's actual users the flexibility they're likely to want day to day.
Can I retrofit under-cabinet lighting into existing cabinets without major disassembly?
Usually yes — a surface-mounted channel along the existing cabinet bottom is the most common retrofit approach, accepting a slightly less seamless look than a fully integrated new-construction channel in exchange for avoiding major cabinet disassembly.
Who should be responsible for coordinating the lighting spec between the cabinet maker and electrician?
Typically the designer or general contractor coordinating the project. Confirming the same final spec — CCT, CRI, IP rating, channel dimensions — reaches both trades identically prevents on-site improvisation that doesn't match the original design intent.
Shop High-CRI LED Strips for Cabinet and Toe-Kick Projects
Shop UL-listed, high-CRI LED strips or review our glossary for IP rating and CRI definitions before specifying your project.