This article will provide you with valuable guidelines and best practices for a successful low voltage LED lighting installation and to ensure safety, optimal performance, and longevity of the lighting system.
I. Dos
1. Do Plan and Design Your Lighting System
Before starting on a low voltage LED lighting installation, it is best to plan and design your lighting system.
- Consider the purpose of the lighting
- The desired effect
- The areas you want to light
Sketch out a lighting layout and identify the necessary components, such as LED fixtures, cables, transformers, and controls. A well-thought-out plan will streamline the installation process and minimize potential issues.
If you need assistance in designing your lighting system, you can also get in touch with our team of expert electricians and engineers in designing your next lighting project.
2. Do Choose High-Quality Products
Investing in high-quality LED strips, low voltage transformers, and mounting supplies is essential to the success of your low voltage LED lighting installation.
Go for reputable brands and factory direct suppliers that offer reliable and durable LED fixtures, cables, and transformers without increasing your budget. High-quality products will not only provide better performance but also ensure the safety and longevity of your lighting system. Additionally, consider selecting products that are compatible with each other to avoid any compatibility issues during installation. HitLights is a Factory Direct LED, Low Voltage Transformer, and Mounting Supplier brand in America that you can rely on.
Products like:
- Premium Quality LED Strips
- COB Lights
- Low Voltage Transformers
- Low Voltage Dimmable Drivers
- Mounting Channels
- Mounting Tapes
- Connectors, Controllers, and Accessories
3. Do Consider Voltage Drop
Voltage drop is a common challenge in low voltage LED lighting installations. It occurs when the voltage decreases along the length of the cable, leading to reduced light output and potential flickering that is typical for longer runs or installations.
To mitigate voltage drop, calculate the cable length and gauge required for your installation based on the manufacturer's specifications and industry standards. Using thicker cables or installing additional power supply points can help minimize voltage drop and maintain consistent lighting performance. If you are unsure how to mitigate this, you can also get assistance from our team of expert engineers and electricians over the phone. They can guide you through if there is any possible impact of voltage drop on your installation plan. Things to consider will be:
- Length of installation
- Density of the LED strip or lighting fixture
- Total power output
- Low voltage transformer/driver to be used
4. Do Follow Manufacturer's Guidelines
Each LED lighting component comes with specific installation guidelines provided by the manufacturer. It is best to check and follow these guidelines to ensure proper installation and optimal performance. Pay attention to recommended mounting methods, wiring instructions, and any specific precautions mentioned by the manufacturer. By adhering to these guidelines, you can avoid potential issues and warranty voids i.e. using an IP30 or an indoor LED strip on outdoor installations.
5. Do Use Waterproof Connectors and Enclosures
When installing low voltage LED lighting outdoors or in areas exposed to moisture, it is essential to use waterproof connectors and enclosures. These components protect the electrical connections from water ingress, preventing short circuits and potential electrical hazards. Waterproof connectors and enclosures also ensure the longevity of your lighting system, even in challenging environmental conditions.
- Use electrical grade silicone caulk to add extra protection
- Use IP67 rated and up on enclosures to ensure proper ingress protection
6. Do Test the System Before Finalizing
Before completing the low voltage LED lighting installation, thoroughly test the entire system to ensure that all lights work properly.
- Check the following:
- Wiring connections
- Voltage levels
- Light output
- Verify that the controllers:
- Dimmers
- Timers
- Testing the system before finalizing the installation allows you to identify and address any issues or adjustments required, ensuring a successful lighting setup and reduces the chances of redo and customer complaints.
II. Don'ts
1. Don't Overload the Transformer
The transformer in a low voltage LED lighting system plays a crucial role in converting the main electrical supply to the appropriate voltage required by the LED fixtures. It is important not to overload the transformer by exceeding its maximum wattage capacity, it is recommended to use only up to 80% of the load capacity for proper use since electricity fluctuates from time to time.
Overloading and using more than 80% of the capacity can lead to overheating, reduced lifespan of the transformer, and even electrical hazards. Always check the wattage ratings of the transformer and ensure it can handle the total wattage of your LED fixtures.
- Follow the 80%/30% Rule - max load should not exceed 80% capacity and lower load should not be below 30% of the transformer’s capacity not to affect the lighting fixture
- Use high-quality low voltage transformers i.e. UL Listed or ETL Listed ones
- You can also check for “No D-Rating” markings if you want to use full capacity, however, it is still best to follow the 80/30 rule at most
2. Don't Ignore Electrical Codes and Regulations
Electrical codes and regulations exist to ensure the safety and compliance of electrical installations. When working on low voltage LED lighting installations, it is vital to familiarize yourself with the relevant codes and regulations in your region. These guidelines cover aspects such as wiring methods, grounding, and safety requirements. By following the electrical codes and regulations, you can prevent potential hazards and legal issues.
- National Electrical Code (NEC - The National Electrical Code (NEC), also known as NFPA 70, is a regionally adoptable standard for the safe installation of electrical wiring and equipment in the United States. It is typically adopted by states and municipalities in an effort to standardize their enforcement of safe electrical practices
- What are some other electrical codes and standards? - The NFPA family of codes and standards that deal with electrical issues are as dynamic as the subjects they address, including NFPA 70, National Electrical Code (NEC), NFPA 70B, Recommended Practice for Electrical Equipment Maintenance, and NFPA 70E, Standard for Electrical Safety in the Workplace.
- What are some common electrical code violations? - Some common electrical code violations include using the wrong circuit breaker, not having enough outlets, not grounding electrical systems, and using extension cords as permanent wiring.
Be sure to check them out especially if you are working with strict compliance with the electrical codes and regulations. If you need a class 1, class 2, or a title 24 product, you can also check this out with our team of expert engineers and electricians.
3. Don't Overlook Heat Dissipation
Generally, LED lighting fixtures generate less heat during operation but they still produce it. It is crucial not to overlook proper heat dissipation to avoid premature failure of the LEDs and potential hazards. Follow the manufacturer's recommendations regarding heat dissipation.
- Avoid overcrowding the fixtures
- Avoid using in enclosed areas where no ventilation is available
4. Don't Forget about Maintenance
LED light strips require less maintenance but it is still best to do regular maintenance to keep your low voltage LED lighting system in optimal condition. Dust, debris, and other environmental factors can accumulate on the fixtures, affecting their performance and lifespan.
Periodically clean the fixtures using non-abrasive materials and ensure that any damaged components are promptly replaced. Additionally, inspect the wiring connections and transformers for any signs of wear or corrosion. By staying proactive with maintenance, you can extend the life of your lighting system and maintain its efficiency. You can maximize the lifespan that even exceeds 50,000 hours if maintained properly.
5. Don't Neglect Safety Precautions
Working with electricity always carries a certain level of risk. When installing low voltage LED lighting, it is crucial to prioritize safety precautions. Always turn off the power supply before working on the installation. Use appropriate personal protective equipment (PPE), such as insulated gloves and safety glasses, when handling electrical components. Avoid working in wet conditions and be mindful of any potential hazards, such as sharp objects or exposed live wires. Safety should be the top priority throughout the entire installation process.
III. Dos and Don'ts for LED Strip Lights
1. Do Choose the Right Type of LED Strip Lights
LED strip lights come in various types, such as single color, flexible strips, rigid strips, and color-changing strips. Determine the specific requirements of your lighting project and select the appropriate type of LED strip lights. Consider factors such as flexibility, brightness, color options, and control capabilities.
- Rope lights
- LED strips
- COB lights
- Single Color or Multi-Colored
- Ingress Protection Rating
- Voltage Rating 12V, 24V, or 48V
Each varies in power output, installation, compatibility, and use which can impact all other aspects of your lighting installations safety measures and maintenance.
2. Do Properly Size and Cut the LED Strip Lights
LED strip lights can often be customized to fit specific lengths. However, it is crucial to follow the manufacturer's guidelines on sizing and cutting. Improper sizing or cutting can result in damage to the LED strips and affect their performance. Use sharp scissors or a cutting tool specifically designed for LED strip lights to achieve clean and accurate cuts. Be sure to check:
- Cut markings to avoid damaging the strips
- Width for fittings
3. Do Clean and Prepare the Installation Surface
Before applying LED strip lights, ensure that the installation surface is clean, dry, and free from any debris. Clean the surface using a mild cleaning solution and let it dry completely. Some LED strip lights come with adhesive backing for easy installation, while others may require additional mounting accessories.
HitLights LED strips do come with adhesive tape backing for ease of installation, however, if this is a permanent installation, it is recommended to add a mounting tape or a mounting accessory in place i.e. mounting channels, clips, etc.
4. Do Test the LED Strip Lights
It is best practice to test the lights when you receive them, before you go to the installation site, and before permanently installing the LED strip lights. Doing this will help you manage loss, wasted time, and redo.
- Upon receiving - you can see if the lights are working by doing a bench test
- Before going to the installation area - you can check if the LED lights you are bringing are also working to avoid wasted time
- Before you install the lights permanently - you should test the lights if they are all working properly, to avoid reinstalling them and going to the hassle of redoing everything
5. Don't Overload the LED Strip Lights
Overloading the LED strip lights with too much power can cause voltage drop, which can lead to dimming or even failure of the lights. Additionally, connecting too long of an LED strip will exceed the power rating for the LED strip sections. Always check the recommended max run length based on its power draw per foot and the internal circuit design.
What are the signs of overloading an LED strip?
- Voltage drop
- Flashing or flickering lights
- Failing LED strips
If you encounter any issues with your LED strip lights, follow these steps to troubleshoot:
- Check the power source
- Check for short circuits or burnt marks on the LED strips or connection points
- Test each connection point - check proper polarity (-) and (+) lines, bents, breaks, or crimped sections
If all fail, you can contact the manufacturer for assistance and warranty coverage.
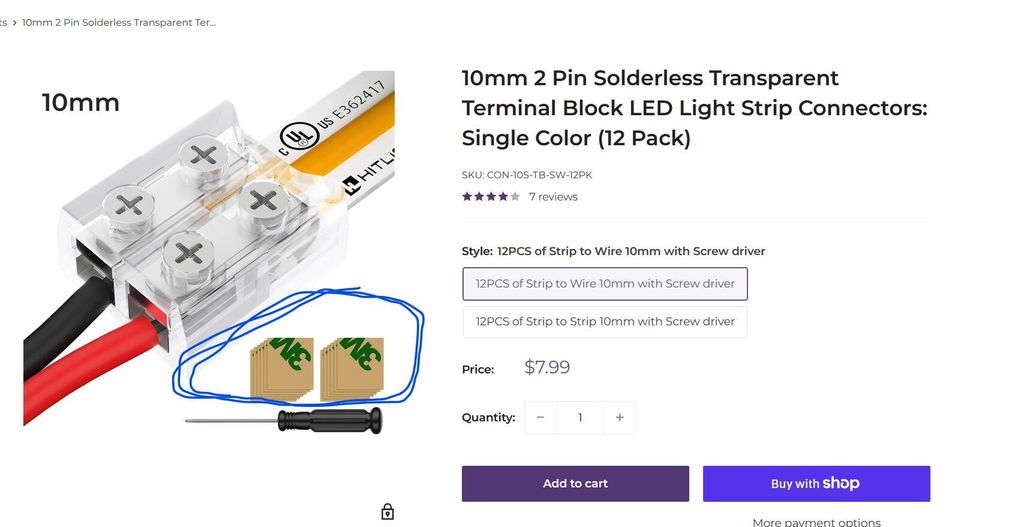
6. Don't Bend or Twist the LED Strip Lights Sharply
LED strip lights are flexible, but they have limitations on how sharply they can be bent or twisted. Excessive bending or twisting can damage the internal circuits and LEDs, leading to malfunction or failure. Follow the manufacturer's instructions regarding the maximum bending radius and avoid sharp bends or twists that exceed the recommended limits. It is best to either solder a DC wire or use a solderless connector when connecting the LED strips or when working with corners or bents. There are several connectors that you can use and one of the most versatile would be the any angle connectors, be sure to check though the width and the number of pins of the LED strip that you are using.
- Single Color LED strips will use a 2-pin / 2-wire connector
- RGB or multi-colored LED strips will need a 4-pin connector
- RGBW LED strips will need a 5-pin connector
- There are also various width sizes for these: i.e. 8mm, 10mm, or even 12mm so be sure to select the right width connector
Conclusion
Proper installation of low voltage LED lighting systems and LED strip lights is essential for achieving optimal performance, longevity, and safety. By following these guidelines, you will create well-designed, energy-efficient, and safe low voltage LED lighting installations and LED strip light setups.
If you need any help in troubleshooting your existing lighting setup or if you need help in your next lighting project, feel free to reach out to us at customerservice@hitlights.com or give us a call at 1 (855) 768-4135. Our team of expert engineers and electricians are here to assist you every step of the way!