- VIEW CONNECTOR OPTIONS" href="#a-class-button-btn-gf_button-href-collections-led-light-strip-connectors-and-accessories-data-exc-target-span-view-connector-options-span-a">VIEW CONNECTOR OPTIONS
HitLights connectors for any of our compatible LED Light Strips used in your projects.
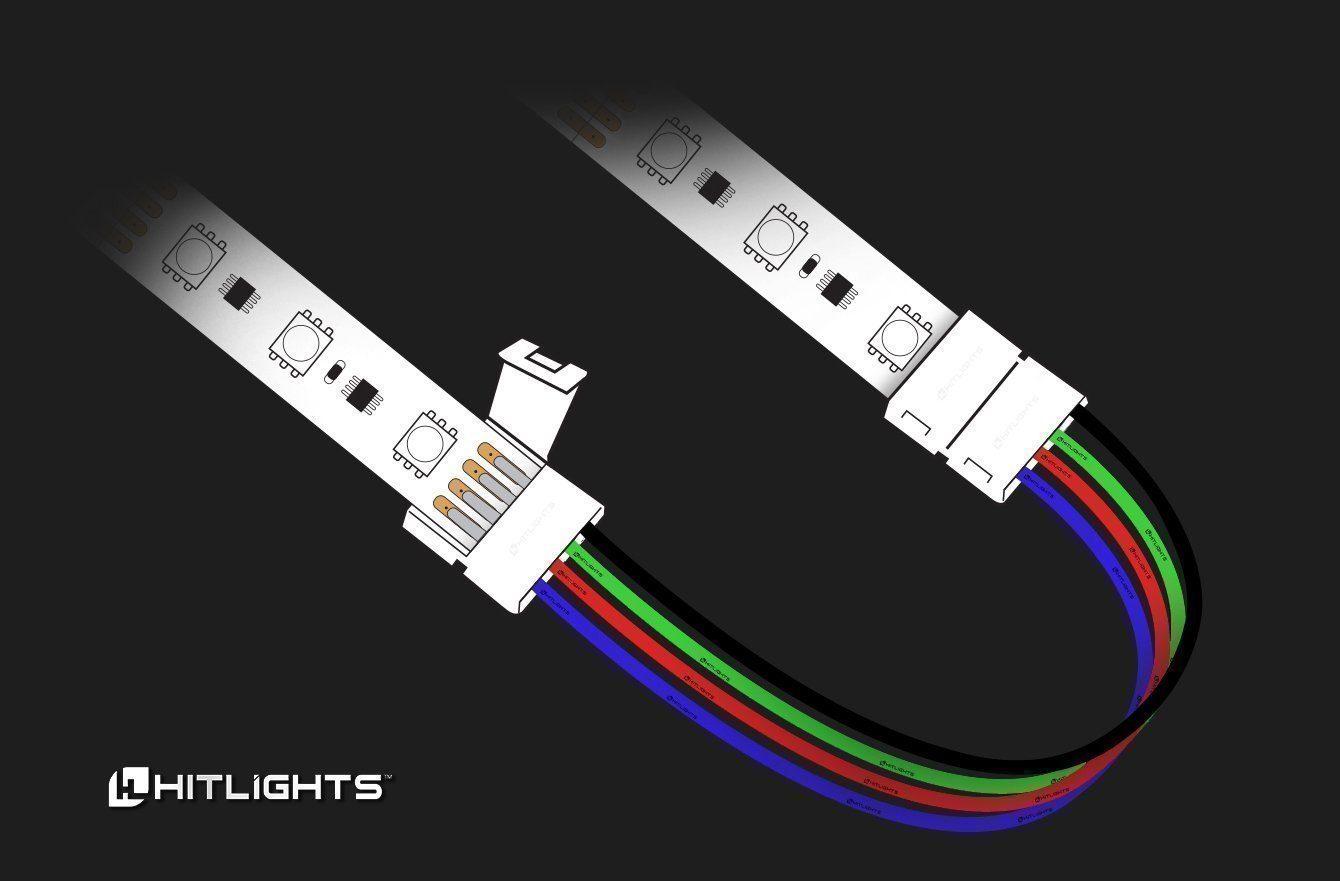
Chances are if you've done or are doing installations requiring making "jumps" to different locations, you will be using our strip-to-strip connectors to do this.
First make sure you are using quality connectors! Many on the market are bound to lose contact or not work at all.
View our collection of HitLights connectors to use with HitLights LED Light Strips to ensure compatibility.
STEP 1. Make sure your strips are plugged in the correct way.
STEP 2. With the polarities right, we can turn the lights on.
To make the rest of these steps as easy as possible, set your strips to white once you've turned them on. If your first strip lights up white, but your second strip doesn't light up at all, or displays a color other than white, then we've got a bit of an issue and we'll need to look a little closer at these connections, which can be finicky to work with sometimes.
STEP 3. If the LED strips aren't both coming up white when you set them to white.
Pop open the connector boxes to see the LED strip's connections. Below is a list of a few situations regarding the LEDs color (or lack thereof) and what may be happening here:
- No color: +12V circuit/copper pad not making good connection with metal pin in connector
- Purple/Pink color: Green circuit/copper pad not making good connection with metal pin in connector
- Yellowish color: Blue circuit/copper pad not making good connection with metal pin in connector
- Aqua/Blue-green color: Red circuit/copper pad not making good connection with metal pin in connector
In case you need to adjust the light strips and metal pads with your bare hands, there's no need to worry because our LEDs run on 12 volts DC, and there is no shock danger there!
With the connector box open, we need to check and make sure that LED strip's oval or circular copper pads are properly lined up with the connector's silver pins.
If you can see that they aren't aligned right, gently move the strip back and forth until the strips light up properly, this usually fixes connection issues!
STEP 4. While you're realigning the LED light strips.
Watch your second strip (the one that wasn't lighting up right) and wait for it to start behaving properly.
Once the strips are working as intended, snap the connector shut and marvel at how great a job you did and how awesome you lights look.
(Marveling takes a minimum of twenty to forty minutes and is a completely necessary step for the connection to remain solid. I'm serious!)
Remember to use our connectors and be assured your installation is compatible with our strips. We are LED Experts and proud of it! We recommend only using HitLights connectors for any of our compatible LED Light Strips used in your projects.
Thanks for reading this installment of our troubleshooting series, we truly hope it has been helpful.
Replace your off brand connectors and ensure compatibility for your projects. View our collection of connectors and accessories as well as RGB options below and take 10% off your entire order with coupon code: CONNECT10
View Related Topics:
When to use solderless connectors
How to control independent RGB & RGBW zones
Mounting channels, protection & light diffusers
Have a question we haven’t answered yet?
Contact us at customerservice@hitlights.com and we’ll do our best to answer it in the next installment. Our team is happy to assist you with any and all of your concerns, questions, and suggestions.

1 comment
david kurtz
very good instruction