Here are ten things that are key points to consider before working with LED strips so that you don't waste your time and your money.
Buying LED strips can be overwhelming because there's really a lot of options and choices in store, locally, online, and many more.
There are over more than three thousand different results.
So we’re going to help you sort that out today and what to look for to make sure you have a successful lighting project.
Table of Contents:
- First, know that there are better options out there.
- Second, the application or what you want your LEDs to do?
- Third thing to know about RGB LED strips is that the white isn't always right.
- Fourth, how many LEDs and the measurement of your application.
- Fifth, area of application
- Sixth and Seventh thing is the Voltage and the Power Requirement
- Eighth is how do you control the lights?
- Ninth is how do you connect the sections?
- Tenth is complete output and finish
- Conclusion
The first key consideration to know is that there are better options out there.
The first thing you're gonna see when you search for LED light strips are the packaged kits.
You can get a hundred feet of LED lights for just under $20. And as you can imagine, they're not really very good.
And if you've spent time on TikTok, you may have seen these, we think they're in the teenage influencer starter kit section.
There are definitely higher quality kits and LEDs out there, but they're going to cost you three to four times as much as the cheaper one.
And the problem with kits is if you don't like any of the units that came with it like the remote control or how they connect via wifi or Bluetooth, and especially if you need more LEDs per meter, then you're really just stuck with it.
You kind of get what you get when going with kits.
As a professional installer or as an enthusiast, you can build your own LED lighting kit for your lighting projects or your lighting renovations. Building your own kit is not that hard.
You will only need three basic things:
- The LED strips
- A way to control them
- A way to power them
Even though there's only three things to consider, there are a lot of options, especially for LEDs.
Second, the application or what you want your LEDs to do?
Now, obviously, you're using LED lights because you want to add some light on things, whether that is just white light that you're using for under cabinet kitchen lighting or maybe you want to add a little bit of fun and add some color and go with an RGB.
Here's a quick overview of how each of these work. Now, with the single color white LEDs, pretty self explanatory.
It is just like your light bulb.
- You have a positive and negative lead from your supply and when you turn it on, it will give you a white light and you can increase and decrease the brightness just like you would with a dimmer switch for a light bulb in your house.
The simple RGBs are a bit the same, except now you're sending three signals down the path, red, green, and blue.
That's what the RGB stands for. So every LED on the strip is going to be the same color based upon how much power you're putting into each of the red, green, and blue.
- So if I turn these on, when it's white, that means all of the red, green, and blue are turned all the way.
- But if I hit the red button, now the red is getting full power and the green and the blue are not getting any power.
- You can kind of think about it like that. It is like, there's three switches and depending upon how you turn them, that's what generates the color.
Then there are what we call smart RGBs or addressable lights. Now these are very different.
- They do have a positive and a negative but then they have a data pin coming down the middle.
- The data pin basically is telling the light what to do. The cool thing is, it can tell each individual LED what to do.
- That's how you can get some really cool animations like this. So you can do some really cool things.
You might be thinking, RGBs just do white anyway. You are correct, but the
Third thing to know about RGB LED strips is that the white isn't always right.
- The white light that RGBs produce is not a true white but a combination of all three colors that show a white light but a bit bluish in color.
- So if you're thinking it'd be nice to have RGBs, but you want to go mainly do white, we would probably recommend going for the single color white if you're concerned about how that is going to look and the temperature of the light.
- There is one other type of LED strip that tries to get the best of both worlds, and that's an RGBW. As it sounds, it combines an RGB, plus a white all into one little LED cell.
- If your application requirement is white, then going with the single color white LED strip is the best choice.
- If you want to add fun, vibe, and color and getting a true white is not a requirement, RGB will be good enough for most applications.
There are also a bunch of model numbers, but in general, the RGBs are gonna be referred to as an SMD5050, and the 5050 just refers to the size of the LED. The single white color LED strips would be referred to as SMD2835.
But just for the record, for a professional, elegant, and clean look, our go to will be SMD2835 for those avid fans of true white colors.
Now that we know the color type or the application.
Fourth thing you need to think about is how many LEDs and the measurement of your application.
- Standard Density - Different ranges but typically will be about 300 LEDs and below
- High Density - This varies per manufacturer, however, it will be about 600 LEDs or more
- COBs - Varies per make, typically, it will be more than 1000 LEDs per roll
But what do you really need? So the biggest thing with the density of LEDs is the more you have in a smaller space, the brighter it will be, as well as the less obvious it will be that there are individual LEDs and it will look like a constant source. The more LEDs would also mean more power output best to always check the specs.
And obviously, the more you have per meter, the more it usually costs. When we add diffusers like an aluminum channel, it helps blend things out, and the output is cleaner, smoother and professional looking.
Your output requirement will dictate the type of LED strip that you will need to use for your lighting project.
- Brighter - Clean Look - COBs might be a better choice like our Premium 24V COB lights
- General to Task Lighting Look - You can go with high density LED strips like the Premium Luma5 High Density Strip or a longer and brighter option 24V LED Light Strip
- Ambient or Warm, Cozy lighting - Standard LED strips like our Premium Luma5 Standard Strip will be perfect!
- To add a professional finish if you will be using an LED strip, you can use aluminum mounting channels to diffuse the light even better
Fifth consideration is the area of application
What you need to consider in this situation is the IP Rating of the LED strip you will be using. Here is a quick overview of how IP Ratings work and what to use based on your requirements:
Ip 20 Strips are for indoor use only. Moisture, even splashed, can cause these strips to short out and possibly fail. They're fine in almost all indoor applications, but you might be careful installing them near showers or sinks.
IP 65 Strips for indoor or outdoor use. They're coated in a silicone material that protects the strip from water. They're not 100% waterproof, however, so we don't recommend exposing them to heavy or regular rain. They're great for installing in covered areas outside, like patios.
IP 67 Strips are for indoor or outdoor use. They're fully encased in a rubber sleeve, meaning that they're impervious to all kinds of weather conditions. You can install these strips almost anywhere you like. They are not, however, 100% submersible - so you can't use them underwater. Even with IP68 strips enclosure, we still do not recommend them be submerged underwater for a longer period of time.
Here is an in depth explanation about IP Ratings
We did see someone in the Amazon review asking if they can mount these in my pool? The answer is “No” even if the strip can manage and handle pressure and water, long duration of exposure may impact the LED strip and for safety reasons.
Sixth and Seventh thing is the Voltage and the Power Requirement
And you will typically see 12V, 24V 48V and the High Voltage options. Now as you go up in voltage, it does not necessarily get brighter in the specific LEDs. However, it does have a significant impact on the output, layout, design and completion of your lighting project.
- 12V LED Strips are compatible with 12V Rated Power Supplies and Drivers, using a 12V LED strip with a 24V Rated Driver will be an issue
- There a few considerations in knowing how much power you need:
- Length of the LED strip
- What is the power draw of the LED strip
- Here is a simple power calculator that you can use to compute the minimum and the maximum power that you can use depending on your project
Here is a quick summary of the features, advantages, benefits, and limitation:
|
Voltage |
Features |
Advantages |
Benefits |
Limitations |
|
12V |
Safe, Dimming, Easy Installation |
Safety, Dimming Control, Simplified Wiring |
Accent Lighting, Under-Cabinet Lighting, Decorative Lighting, and more |
Limited Brightness, Shorter LED strip Runs - can be mitigated |
|
24V |
Longer Runs, More Light Output, More options |
Longer LED strip Runs, Brighter Lights, Flexibility |
Larger Installations, Longer Distances |
Moderate Energy Efficiency, Compatibility concerns - can be managed |
|
48V |
Efficient, Compatibility |
Energy Efficiency, Professional Lighting, Control Compatibility |
Commercial Applications, Professional Setups |
Limited Fixture Options, Higher Cost, NEC considerations and professional electrician required |
|
High Voltage |
Standard Infrastructure |
Compatibility, Wider Fixture Range |
General Indoor/Outdoor Lighting, Standard Electrical Infrastructure |
Safety Concerns, Higher Energy Consumption, NEC considerations and professional electrician required |
Note: In special cases, you will be using batteries or battery packs to light up your project, especially if this are for customized units or projects, you can use this battery life calculator to check out the battery capacity that you will need.
Recommendation: If you are a professional electrician, contractor, etc the best option is using a 12V and 24V lighting system and as an integrator it can be a mixture using these with your clients existing high voltage lighting system.
Easy, simple, energy efficient, and right pricing are your key takeaways plus leaving less carbon footprint due to the systems less power consumption and savings that you can create for your customers.
Eighth is how do you control the lights?
So there are different types of controllers, and they're basically what give the instructions to the LEDs. And like everything else, there are options.
Here is a quick summary of the features, benefits, and limitation:
|
Voltage |
Control Systems |
Features |
Advantages |
Limitations |
|
12V |
Dimmer Switches |
Manual and Automatic brightness adjustment |
Simple, Affordable |
Limited Control Precision, No Automation |
|
Wireless control, Dimming, Color-changing options |
Convenience, Remote Operation, Dimming Control |
Limited Range, Battery Replacement |
||
|
Wi-Fi Smart Controllers |
Smartphone App Control, Automation |
Remote Access, Scheduling, Integration with Smart Home Systems |
Requires Wi-Fi Network, Potential Connectivity Issues |
|
|
24V |
Dimmer switches |
Manual and Automatic brightness adjustment |
Simple, Affordable |
Limited Control Precision, No Automation |
|
DALI (Digital Addressable Lighting Interface) |
Individual Luminaire Control, Dimming |
Precise Control, Scalability, Addressable Control |
Installation Complexity, Higher Cost |
|
|
0-10V Dimming System |
Analog dimming control |
Compatibility, Smooth Dimming |
Limited to Dimming Control, Not Addressable |
|
|
DMX (Digital Multiplex) |
Color-changing, Dynamic Effects |
Versatile Effects, Addressable Control |
Complex Setup, Specialized Applications |
|
|
48V |
KNX (Building Automation) |
Comprehensive Building Control |
Integration with HVAC, Security, and Other Building Systems |
Professional Installation, Complexity |
|
Dimmer Ecosystem |
Customizable Lighting Scenes, Automation |
Scalability, Integration with Specific Ecosystem |
Requires Specific Infrastructure, Higher Cost, Professional Installation |
|
|
Smart Hubs |
Interoperability, Automation, Remote Control |
Compatibility with Various Devices, Mesh Networking |
Requires Hub, May Require Additional Devices, Professional Installation |
|
|
High Voltage |
Wall Switches and Dimmers |
Manual control, Dimming |
Traditional Control, Direct Dimming |
Limited Automation, Wiring Constraints |
|
Lighting Control Panels |
Centralized Control, Scene Programming |
Customizable Scenes, Centralized Management |
Professional Installation, Complexity |
|
|
DMX (Digital Multiplex) |
Color-changing, Dynamic Effects |
Versatile Effects, Addressable Control |
Complex Setup, Specialized Applications, Professional Installation |
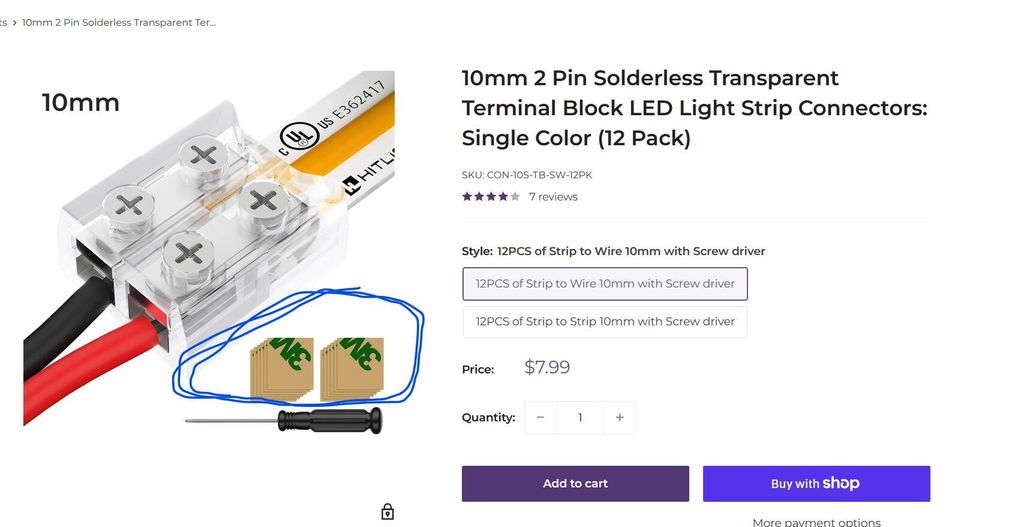
Ninth is how do you connect the sections?
When it comes to connections, there are several options but the best way to connect the strips with each other and to the rest of the lighting system is by soldering. This type of connection is the most stable, cost effective, and ideal, however, it somewhat needs expertise. The next best option will be to use connectors.
Here is a quick summary of the features, benefits, and limitation:
|
Connection Method |
Features |
Advantages |
Benefits |
Limitations |
|
Soldering |
Permanent, Reliable Connection |
Strong Bond, Durable |
Minimal Voltage Drop, Sturdy Connection |
Requires Skill, Time-Consuming |
|
Connectors |
Tool-Free, Quick Installation |
Easy, Quick, No Soldering Required |
Convenience, Reusability, Less Risk of Damage |
May Introduce Voltage Drop, Compatibility concerns |
|
Wire Nuts |
Simple, Removable |
Easy, Reusable, No Soldering |
Flexibility in Reconfiguration, Easy Maintenance |
Bulkier, May Introduce Voltage Drop |
|
Terminal Blocks |
Secure, Modular |
Structured Connection, Easy Expansion |
Neat Wiring, Compatibility with Various Wires |
Space Constraints, Manual Installation |
|
Crimp Connectors |
Reliable, Vibration-Resistant |
Secure, Vibration-Resistant, No Soldering |
Strong Connection, Suitable for Moving Applications |
Specialized Tools Required, One-Time Use |
|
Quick Connectors |
Tool-Free, Fast Connection |
Quick, Easy, No Tools Required |
Rapid Installation, Accessibility to Non-Technical Users |
Limited Current Capacity, Durability Concerns |
|
Snap-On Connectors |
Easy, Tool-Free |
Simple, Quick, No Tools Required |
Fast Setup, Suitable for Temporary Installations |
Limited Long-Term Durability, Lower Load Rating |
Note: Your connection can be any combination of the above, ideally, best foot forward will be soldering + connectors or terminal blocks for that professional and neat look plus ease of installation.
Tenth is complete output and finish
The last step is making sure that the finish of your installation is clean, neat, professional, and functional. A few reminder when completing the job:
- Test the lights first before doing the final installation/permanent install.
- Using mounting tapes, diffusers, and aluminum channels always have their advantage - weigh your clients option in considering these in adding a cleaner and a more professional look on the final output.
- CLAYGO (Clean As You Go) - there is no better way to end the installation area than to leave it clean like the first time. This sends an impression to your customers and clients of the level of professionalism you have when it comes to doing your projects.
Your best bet, is this summary detailing the different options in completing your project:
|
Installation Finishing Method |
Features |
Advantages and Benefits |
Limitations |
|
Aluminum Channels |
Sleek, Professional |
Provides Protection, Diffuses Light, Enhances Aesthetics, Reduced glare |
May Require Additional Cost, Installation area compatibility |
|
Mounting Clips |
Secure, Easy Installation |
Quick and Easy Mounting, Neat look |
May Not Support Heavy Strips, Limited Flexibility |
|
Adhesive Backing |
Simple, Versatile, Semi-permanent installation |
Easy installation, suitable for various surfaces, self-adhesive |
Adhesive May Weaken Over Time, Limited Reusability |
|
Diffusers/Covers |
Softens Light, Protection |
Diffuses Light, Protects LED Strips from Dust and Damage, enhanced aesthetics |
May Reduce Brightness, Limited Design Variety |
Conclusion:
Knowing these 10 Key Points will put you in a better position when it comes to choosing the things you need to consider when using LED strips for your lighting projects.
This is again, John, and until next time, have a bright week!
If you need further assistance, feel free to reach out to us at customerservice@hitlights.com or give us a call at 1 (855) 768-4135. Our team of expert engineers and electricians are here to assist you every step of the way!
If you are a professional installer, an integrator, or a business owner and you want to:
Save MORE! And Do MORE! Project!
You can join our professional partner program RISK-FREE, NO CONTRACTS, NO HASSLE PROCES there is nothing to lose but MORE to GAIN!
*Disclaimer: The information provided in this article is for general informational purposes only.