- What is voltage drop?
" href="#span-style-font-weight-400-what-is-voltage-drop-span-span-style-font-weight-400-br-span-span-style-font-weight-400-span"> What is voltage drop?
- Minimizing voltage drop and dimming" href="#span-style-font-weight-400-minimizing-voltage-drop-and-dimming-span">Minimizing voltage drop and dimming
Low voltage lighting (like our strips, available in 12 volt and 24 volt DC) has its advantages. It’s easy to work with. It’s safe. Components and parts are readily available. One of the rarely discussed downsides of low voltage lighting, however, is voltage drop. This week’s blog will discuss what that is - and what you can do to avoid it.
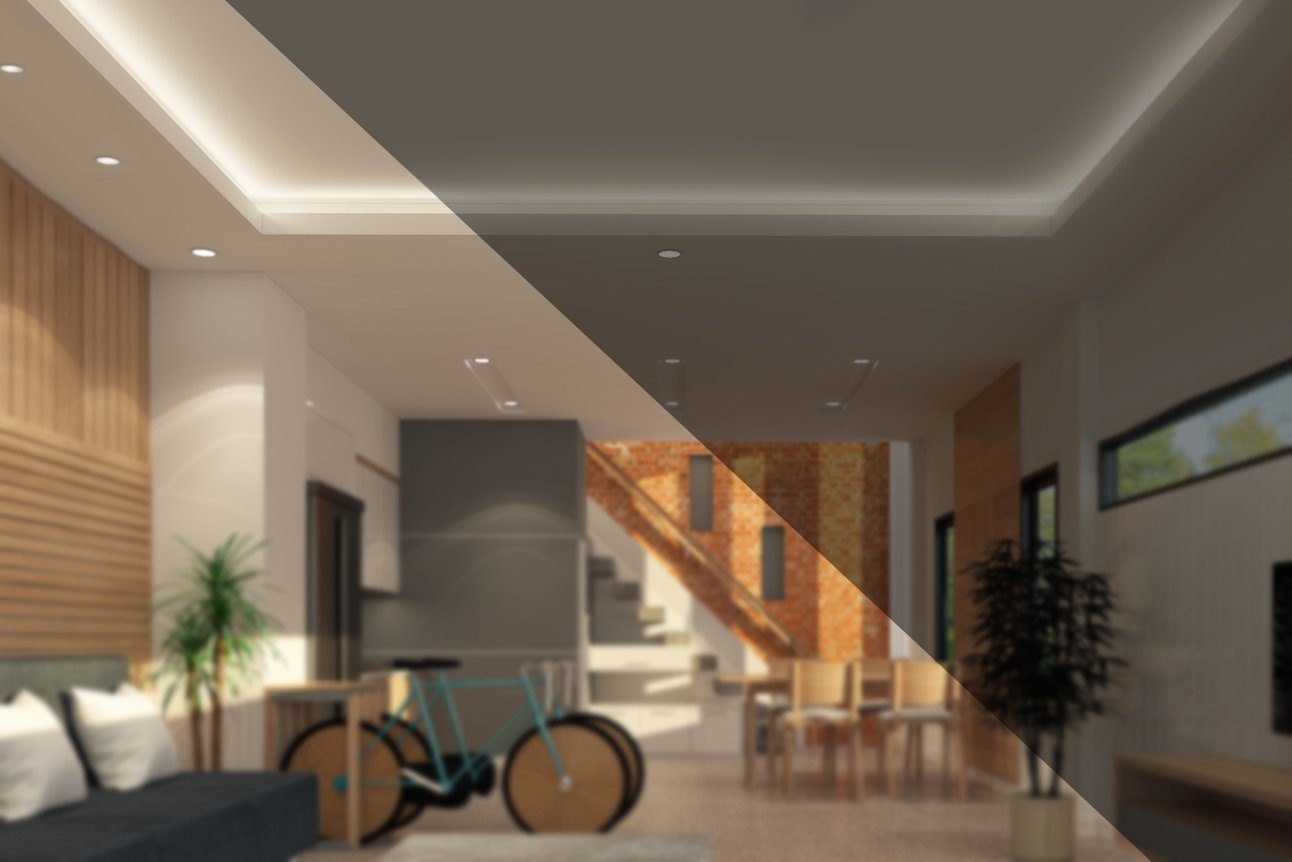
If you've encountered strips that are bright at one end and dimmer at the other - voltage drop is to blame, and this blog is for you!
What is voltage drop?
When electricity travels through a conductor (such as a wire or an LED strip) it encounters resistance. This resistance, however small, lowers the voltage as the electricity travels through the strip. This loss of voltage, and power, results in some waste heat (note : this is how electric heaters, stovetops, and even traditional incandescent light bulbs work!). If you’re not trying to heat up your conductor - if, say, you’re trying to light up some LED light strips - resistance, and the resulting voltage drop is bad.
LED strips are designed to run at an optimal voltage. Above this voltage, your LEDs output more light than they were designed for, generate more heat, and fail quicker. Below this voltage, and your LEDs get dim. At extremely low voltages, the LEDs might behave erratically - exhibiting flickering, or even flashing. None of these are good.
Voltage drop comes into play when your LED strip runs, your wiring, or both, are too long. The resistance in these conductors adds up - and your LEDs start to operate below their optimal voltage range, resulting in dimming. With proper system design and component choice, however, voltage drop can be minimized.
Minimizing voltage drop and dimming
There are a handful of ways to minimize voltage drop. First, minimize wire length wherever possible. This might mean running wire through a wall, or a ceiling, instead of going around a room - if possible.
Second, make sure to use an adequately sized wire when making runs between your power source and light strip. A larger wire has less resistance, meaning that it carries power more efficiently. Based on your power load (in watts) and your wire length (in feet), you can select an appropriate sized wire using our handy voltage drop chart here.
Third, is to minimize LED strip run length. The simplest way to minimize run length is to split your run into two sections. As an example, say that you require fifty feet of strip to light up a room. Rather than one long fifty foot run, we would recommend placing your power supply in the middle, and then splitting twenty-five feet left and twenty-five feet right. It’s not necessary to halve it exactly - if it’s more convenient a split of twenty feet and thirty feet will work just fine too.
How long is 'too long'? We can't answer that question 100% accurately, as we don't know your total load, power source, wiring, and more - which all affect voltage drop. We do recommend, however, using no more than two of our Standard Density strips, and no more than one of our High Density strips back to back (in series). If your runs need to be longer, you'll need to use one of the methods above.